Hosting with Gameye
This feature is available on the Photon Bolt Pro version.
Gameye is a hosting service that provides deployment of Game Servers worldwide using their agnostic infrastructure.
Photon Bolt has support to run on Gameye and we provide on this tutorial all you need to get started and deploy your game server in a few minutes.
About Gameye Service
The Gameye service is built around virtualization using Docker Containers, each container is a game server that listens for players.
You can create, remove, and list those game servers using their REST API easily, making it great to do server orchestration and automation.
You can read more about the service itself on the official website https://gameye.com/ and on the documentation page https://docs.gameye.com/.
Workflow
This tutorial will focus on how you can have a dedicated game server running and being able to connect to it directly using Photon Bolt Pro.
We will follow the next steps:
- Configure a Headless Game Server;
- Deploy the Server Container on
Gameyeservice and start the dedicated server; - Build Game Client able to search and connect to a remote server.
There are a few sub-steps on each of those steps that will be described in the following sections.
All the necessary files to build this scheme will be available as open-source projects.
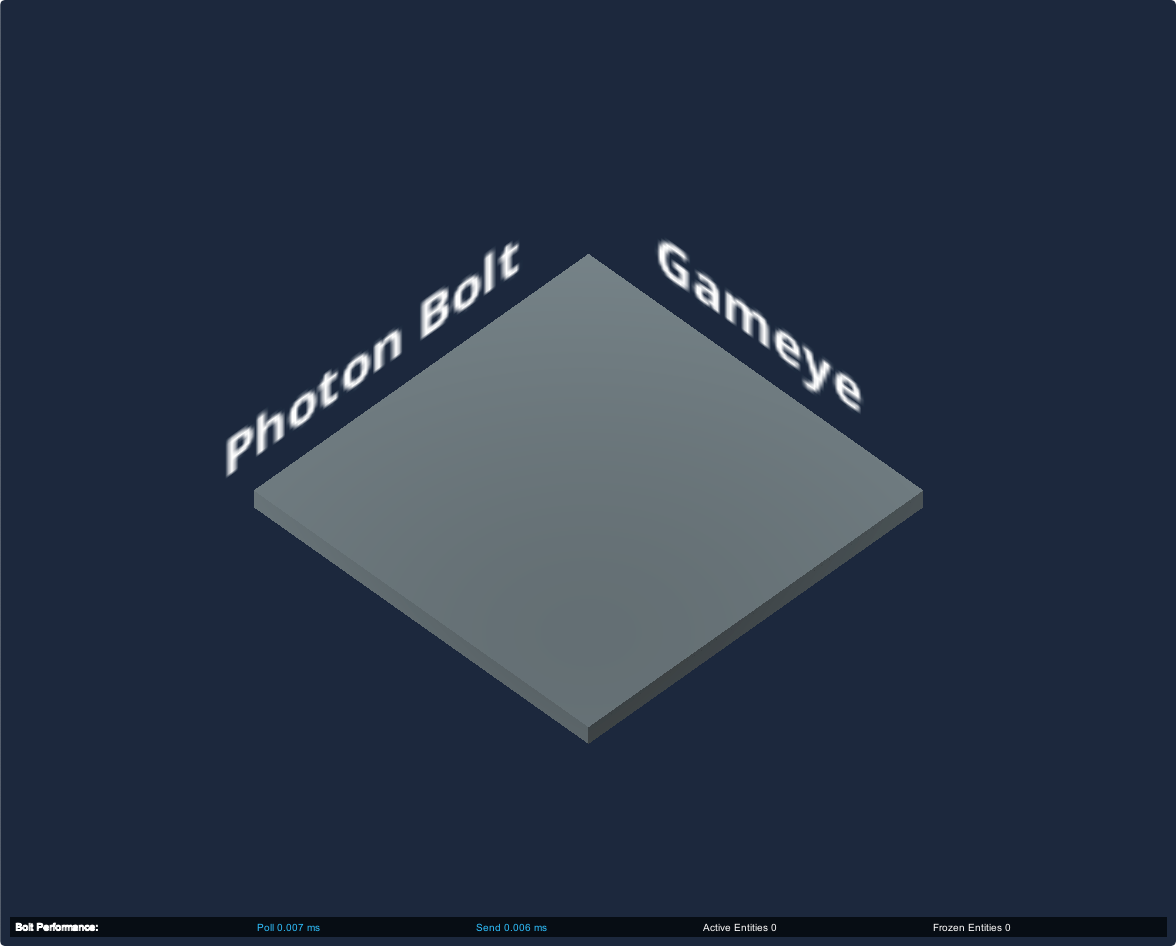
The following image show an overview of the parts we will be building.

Prequisites
Before you start building all the necessary parts, you need:
- Photon Bolt Pro. This sample is intended to be used with the direct connection capabilities of the Pro version.
- Contact the
Gameyestaff in order to get access to their services, including receiving a uniqueApplication Token. This will be used to authenticate your calls. - Basic understand of how Docker and DockerHub works. How to configure, build, run, and upload
docker imagesanddocker containers. You also need:- A
DockerHubaccount, if you don't already have one. - A repository where you will upload your server image.
- A
- Have completed the basic Bolt Tutorials (
Getting StartedandAdvanced Tutorial). - Install the
Linux Target Platforminto your Unity editor.
Build a Headless Game Server
In order to run a dedicated server on Gameye, we need to work on a two-part solution: (i) Unity project to run a headless server and listen for connections and (ii) encapsulate the server binaries into a docker image, that later will be used to containerize the application.
Unity Project
Inside the SDK package you received, you will find a folder called samples_pro, which includes among other sample projects, the GameyeIntegration folder.
It contains all necessary files to run the headless server.
Next, we will describe some of the code used for the Game Server.
The Scenes folder has the 3 main scenes that we will be using on this sample: (i) GameyeHeadlessServer, (ii) GameyeInGame, and (iii) GameyeClient.
For the game server, we will be using the first two scenes.
Starting from the GameyeHeadlessServer scene, it uses only one simple Game Object that runs the GameyeServer script, our main entry point for controlling the game server.
Opening this script, you will see that it's fairly simple.
The script is responsible for starting the Bolt server by calling BoltLauncher.StartServer(serverPort) and loading the GameyeInGame scene.
But there are some key aspects that you need to be aware of.
At Start, it parses the command-line arguments to load pieces of information like which map to load, but most importantly - which ports to bind.
We use two main ports when running a dedicated server like this: (i) the server port, where we will be listening for new player connections, and (ii) the query port, used to retrieve realtime information from the server using the A2S Query Protocol.
When hosting a server on Gameye, it's used a tool called Igniter(github).
This tool keeps track of the current state of the game server and reports it back to their service manager.
In order to communicate with Igniter, you need to print some specific strings to the stdout stream (we will describe better those messages in the next section), and for that, we've built the GameyeIgniterApi, that simply logs those key strings.
It's used by the GameyeServer script to expose it states, like starting, playing, or exiting, for example.
Another important aspect of the GameyeServer script is the usage of the A2SManager class.
This manager is responsible for updating the internal metadata about the server.
This information will later be used by the client to check the server configuration.
Also, as an example, this script auto-shutdown the game server when there is no player connected to the session.
So, it will start the game server, wait for players to join, and let them play as long as needed, and when the last player disconnects, it will shut down automatically.
You can extend this behavior to restart the game, or include a timer, for example.
About the GameyeInGame scene, for now, it's just a place holder, there is no real content or gameplay, we use it just to make sure the server and clients have another scene for the playing.
Great, now that we have a better understanding of what will be happening on the server, let's build it:
- Open the
Build Settingswindow, and include theGameyeHeadlessServeron index0andGameyeInGamescene on index1; - Make sure to recompile Bolt (
Bolt/Compile Assembly) so it's aware of the scene configuration; - Change the
Target PlatformtoLinuxwithArchitecturex86. - Build the game. We suggest the name just
game.x86for the binary, as we will be using this name for now on.
Building the Game Server Docker Image
One of the key characteristics from the Gameye service, is that it's agnostic of how you build your game executable, it just need a reference for a Docker Image and it will be able to spin any number of servers you want.
But, this image requires some setup and need to use the Igniter tool, that we mentioned before.
Igniter, as the name implies, will run (ignite) your game and control the executable.
In order to make this as smooth as possible, we've already built a template that you can use to build the Docker Image with just a few steps.
Go ahead and clone the project found in https://github.com/BoltEngine/gameye_bolt_server_image.
The repository already contains a description of how to build the image, but we will summarize it here:
- Download the repository into your machine;
- Build the Game Server binary (we've done this on the last step);
- Copy the server files into the
buildfolder, the executable and the data folder. Remember that we used the namegame.x86as the executable name. - Open the
Makefilefile, and change the variablesDOCKER_USERNAME(DockerHubusername) andGAME_IMAGE_NAME(DockerHubrepository name). - Build the image by running
makeon the folder.
Great, now you should have a Docker Image already set up for upload.
We will now take some notes about all the configuration you need to be aware of when using this image and also the Gameye service.
Starting with the Docker side, you will find a Dockerfile at the root folder.
This configuration file describes how to build the image, and here are main points to look at:
- The image is based on the
ubuntu:latest. That is why we've built the Unity project as aLinuxexecutable. This is the recommended OS for running games onGameye. - It defines several environment variables, that are used during the build to allocate some files on specific folders, like the game binaries into the
GE_DIRGAMEfor example. TheREADME.mdfile describes all those variables. - In the end, we signal to
Dockerthe image needs to execute thedocker-entrypoint.shasENTRYPOINT. If you look at this file, it just runs theigniter-shell(executable fromIgnitertool) with some specific params. You can read more about its usage on the official page.
Now let's talk about the Gameye related files.
If you've read the service documentation, you know that we need two kinds of configurations files: (i) args.yaml and (ii) config.yaml files.
In order for our game server to work together with the orchestration system, we need some detailed values on those files.
In our case, the args.yaml file, in fact, can be found at arg/main.yaml, and it registers all the necessary ports that need to be open to our server to be able to talk with the external world.
As you can see, we've enabled: (i) server (game server port), (ii) query (for the A2S queries), and (iii) all Photon related ports (if you plan to use Photon as matchmaking).
This file needs to be sent to the Gameye account manager that you've contacted before, this person will set up it for you.
Following the same pattern, we have the config.yaml file, found at config/main.yaml file.
Keep note that the args and config file need to use the same name (main.yaml in our case), that is why they are in their own directories.
The configuration file a little more extensive, but it is easy to read:
cmd: here we describe the command-line arguments that will be sent to our server. So we start the game in headless mode (-batchmode -nographics -logFile) and pass the necessary ports info as arguments (-port ${port.server} -query ${port.query}).Igniterwill be responsible for replacing the dynamic values with the right ones.script: this section describes all states and transitions our game server can perform, and here is where we configure thekey stringswe've talked about before. As you can see,Igniterexpect some values likeGAMEYE STATE CHANGE PLAYwhen changing to theplayingstate, for example. All the params are well documented onGameyepage.defaults: in the end, we setup some default values for our arguments.
Now you know all the basics of how the template works, and you should be ready to make any necessary modifications.
Before we upload the Docker Image, you need to setup the Gameye access to your Docker repository and configure the push webhook, so the service knows when you upload a new version of the binary.
You can read more about this on the Gameye documentation page, look for Sending a build notification and Image Permissions section.
Again, the Gameye account manager can help you with this step.
Great, now that you have all this ready, just upload your image to DockerHub running the command make upload or do it manually with docker push username/image_name:version.
In just a few minutes, it should already be available for usage.
Check Server Deploy
One simple way to check if all went fine with your deploy, is to use the Gameye REST API to request a new server and check if it's there.
The documentation about the REST API can be found on this link.
Now it's time to use your Gameye Application Token, this info was sent to you by the Gameye staff.
Replace all {key} with the string of your Token.
First, we need to check if there is any server already running (which should not be any), by running the following command:
bash
curl --request GET \
  --url https://api.gameye.com/fetch/match \
  --header 'authorization: Bearer {key}'
You should get a reply like the one below, which indicates no running servers:
JSON
{
    "match": {}
}
In order to request a game server, we will be using another API endpoint, like it's shown below:
bash
curl --request POST \
  --url https://api.gameye.com/action/start-match \
  --header 'authorization: Bearer {key}' \
  --header 'content-type: application/json' \
  --data '{"locationKeys":["{locationKeys}"],"matchKey":"{name}","gameKey":"{gameKey}","templateKey":"{templateKey}","endCallbackUrl":"{endCallbackUrl}"}'
A few notes about this call:
locationKeys: there is a list of available regions here.matchKey: must be a unique ID every time you make a new request. Using duplicated keys will cause an error, even if the server no longer exists.gameKey: this key represents which server will be launched, it's fixed and designed by theGameyestaff. They will also inform you which key to use.templateKey: the template value must match the name of the files you used for theargs.yamlandconfig.yaml. In our sample, we've been usingmain.yamlas the name of those files, so you need to pass the string"main"on this argument.endCallbackUrl: as the name implies, this is a webhook that will be invoked when the match ends. Useful to get some statistics from your server.
Making the request with the right params, you should get something like:
JSON
{
    "id": "bfc5890f-9ba2-46ef-bb69-31ac5cf6a092",
    "image": "boltgameimage",
    "location": "washington_dc",
    "host": "123.456.789.000",
    "created": 1590002692454,
    "port": {
        "server": 53723,
        "query": 51642,
        "masterServer1": 55488,
        "masterServer2": 49784,
        "gameServer1": 62047,
        "gameServer2": 50203,
        "nameServer1": 57337,
        "nameServer2": 61128
    }
}
Indicating that we successfully deployed a new game server and it's ready for some players.
As you can see, we have information about its public IP and listening ports, as we asked in the args.yaml file.
Great, now we will shutdown this server, so we don't have any hanging around.
Use the following call to ask Gameye to stop the session:
bash
curl --request POST \
  --url https://api.gameye.com/action/stop-match \
  --header 'authorization: Bearer {key}' \
  --header 'content-type: application/json' \
  --data '{"matchKey":"example-match"}'
As you can see, we will be using just the matchKey to signal which session to be killed. Easy.
There is no reply to this request.
Game Client Details
Now that we have a working server, we need a client to connect to it.
In this section we will describe the client sample we've built, so you can start from there and extend it to your needs.
Looking again at the GameyeIntegration folder inside the samples_pro, you will find the GameyeClient scene, as we noted before.
This will be the starting point for our players.
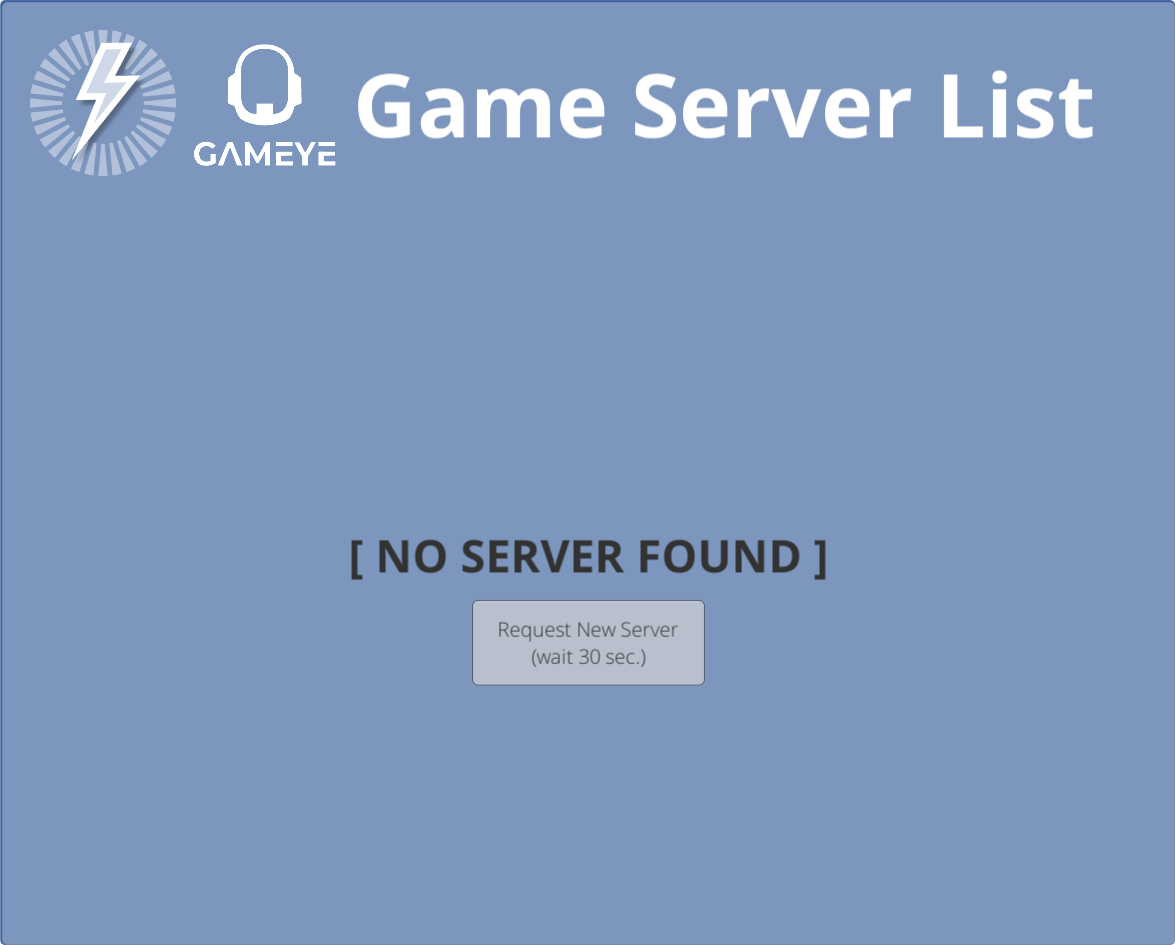
In summary, the player will make use of a simplified Lobby scene, where you should be able to see all available game servers, but also request a new server, if none was found as we did using the REST API.
The UI for the player is pretty simple, it consists of two main parts: (i) the No Server Found panel with the Request New Server button, and (ii) the Lobby list, that shows the list of servers.
It's managed by GameyeUIManager class, responsible for triggering the server request using events (see requestServerEvt action on the class) and populating the list of servers with data retrieved from the service (more on this next).
Also, there is the GameyeUIServerInfoManager class, which represents an item in the server list, populating the UI content and responding to the click on the Join button.
The core sections of the Game Client are the following classes:
GameyeApi
Here we've implemented a simple HTTP client based on the REST API described on the Gameye documentation.
It is able to perform GET and POST request, as we need both types when using the API.
For this sample, we will be using only two types of request, represented by the following methods:
RequestServer: by calling this function, you will be requestingGameyeto spawn a new game server with some predefined values. The result of this operation will be received on the Action callback passed as the argument.GetSessionList: this method is responsible for request the current list of active game servers and parses their information to a managed format, you can found the class definitions for this at theGameyeData.csfile.
GameyeClientManager
This is the central class of the Player management, responsible for integrating all other already described parts and making them work together.
We can describe this class as able to perform the following tasks:
- Update the list of active servers by requesting information from
Gameyeservice using the API and populating the UI with the processed data. This occurs on a regular basis based on therefreshIntervalvalue (UpdateSessionsmethod). - Request the creation of a new game server based on the UI input (
RequestServermethod). - Start a Bolt Client and connect to a Remote Game Server (
JoinSessionmethod).
All its methods are well documented with more in-depth information.
Running the Game Client
Now that we have a better idea of how the moving parts are working together, let's configure our client to connect to our dedicated server.
The Unity client consists of two scenes, as we had on the server: (i) GameyeClient is the menu scene, that we described on the last section and (ii) GameyeInGame, the same in-game scene, that as we saw, is just a placeholder.
Follow the next steps to run the Game Client:
- Open the
GameyeClientscene. You will notice a Game Object namedGameyeClient(very original name) in the scene, open it on the inspector. It has aGameyeClientManagercomponent where you must configure yourGameye Application Token. You can apply the prefab changes and save the scene. - Open the
Build Settingswindow and setup the scene list withGameyeClientwith index0andGameyeInGamewith index1; - Make sure to recompile Bolt (
Bolt/Compile Assembly) so it's aware of the scene configuration; - From now you can either run the client on Editor or build a standalone version.
With the Client running you will notice that the Request New Server button is disabled by default for 30 secs.
This is just to make sure we don't have any already running server before trying to request a new one.
The list of servers is updated every 20 secs by default, you can change this by moving the "Refresh Interval" slider.
As Gameye has a limit of API request per minute, we suggest that you leave it at a reasonable value.
If no server is available, just click on the request button, and the async request will be performed.
With all going well, you will notice the JSON response on the console logs and within a few seconds (after another refresh update), the session will popup on the Lobby list.
Some server info will be displayed like the server name, currently loaded map, the number of players/max number of players, and the creation time.
All this extra information is available through the A2S Server Queries API.
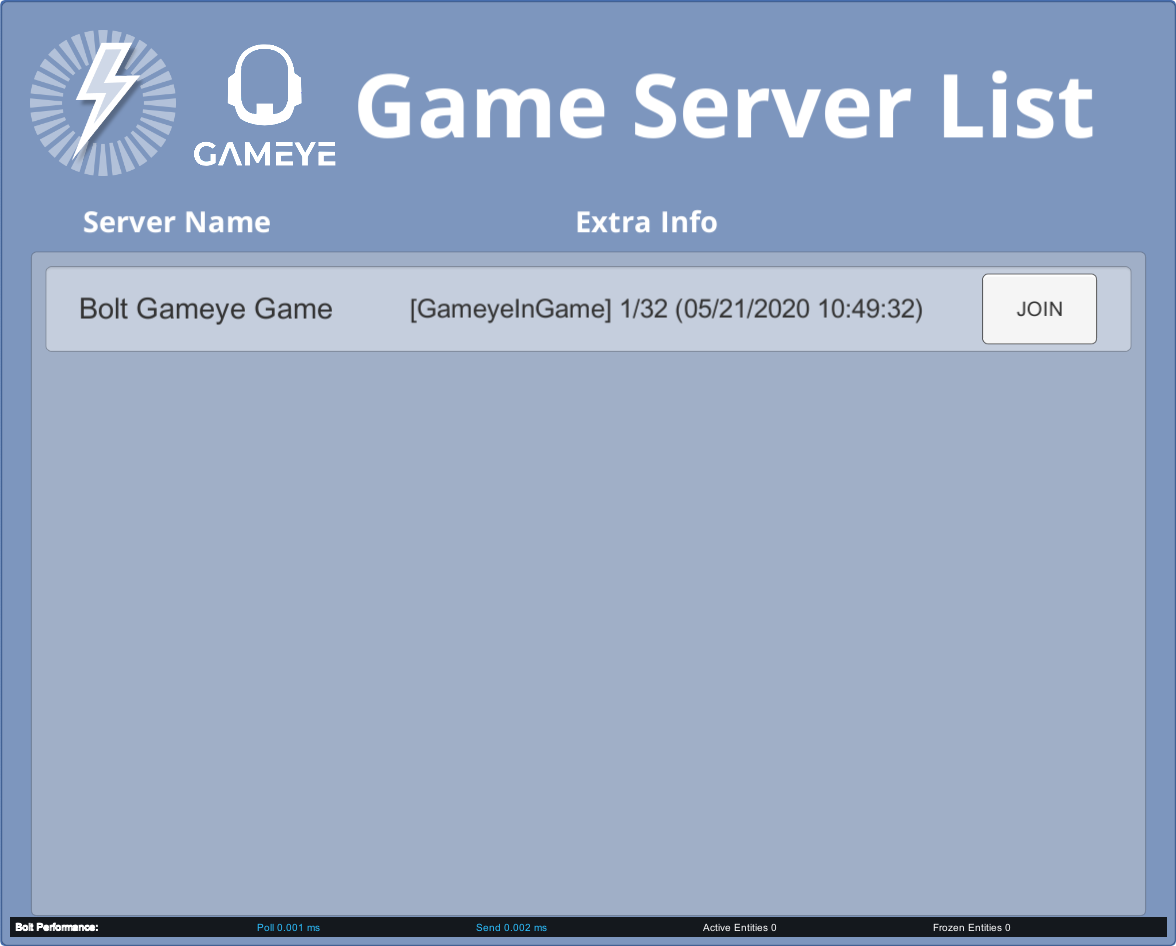
To connect to this server, just click on the Join button.
The client will connect and load the in-game scene.
Great, from there, you can extend the basic functionality of the sample code to filter the sessions, show more information about the server, or even request specific game server types (this is done by having multiple config.yaml files, with different names and different values, and when requesting the server, using the right templateKey).