Bolt 105 - Objects & Arrays
Bolt supports built-in replication of complex types called Objects and Arrays, they are very similar to their plain code C# counterparts, but differ in a few ways. Objects are defined in the Bolt Assets window and can be used as the type for an Array or Object property on a state or another object.
Objects gives you an easy mechanism to encapsulate a group of properties and allows you to implement complex hierarchical data in Bolt that is easily re-usable across different Bolt states. We are going to demonstrate how to use objects inside Bolt by implementing weapon slots for a simple shooter game, we are not going to actually build a game just the data structure and states to replicate the weapons.
Start by creating a new Object in the Bolt Assets window using the right-click menu.
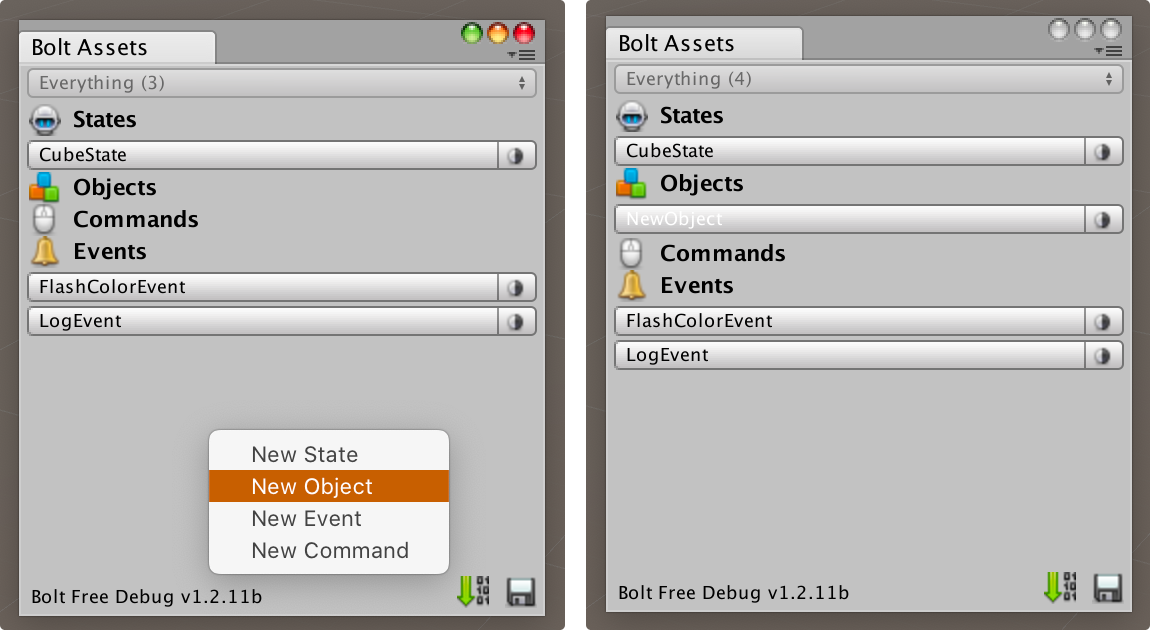
Name the object WeaponSlot, and give it two properties: WeaponId and WeaponAmmo. They should both be integers. As you can see the objects in Bolt do not have properties of their own like the events and states, they are simply containers for data that can be included in other assets.

On our CubeState we are now going to add a new property called WeaponsArray that has the type Array, the Element Type set to Object, the Object Type set to WeaponSlot and we're going to give it an Element Count of 3. We're also going to add one more property called WeaponActiveIndex which should have the type Integer. This is for tracking which weapon we have active.

Important: As always, remember to compile Bolt after we are done with our changes in the Bolt Assets and Bolt Editor windows.
The WeaponsArray property is by far the most complex we have created so far, what Bolt will do is create an array of three 'WeaponSlot' objects for us, which we then can modify and have all of their data automatically replicate over the network.
Note that when we say array here we don't mean an actual C# WeaponSlot[] array, Bolt provides its own array-like type which lets Bolt track changes made to objects easily. The actual type of the WeaponSlots property will be Bolt.NetworkArray_Objects<WeaponSlot>, in general you can mostly ignore this as the normal indexing operations work on this class also and it has the same Length property, etc.
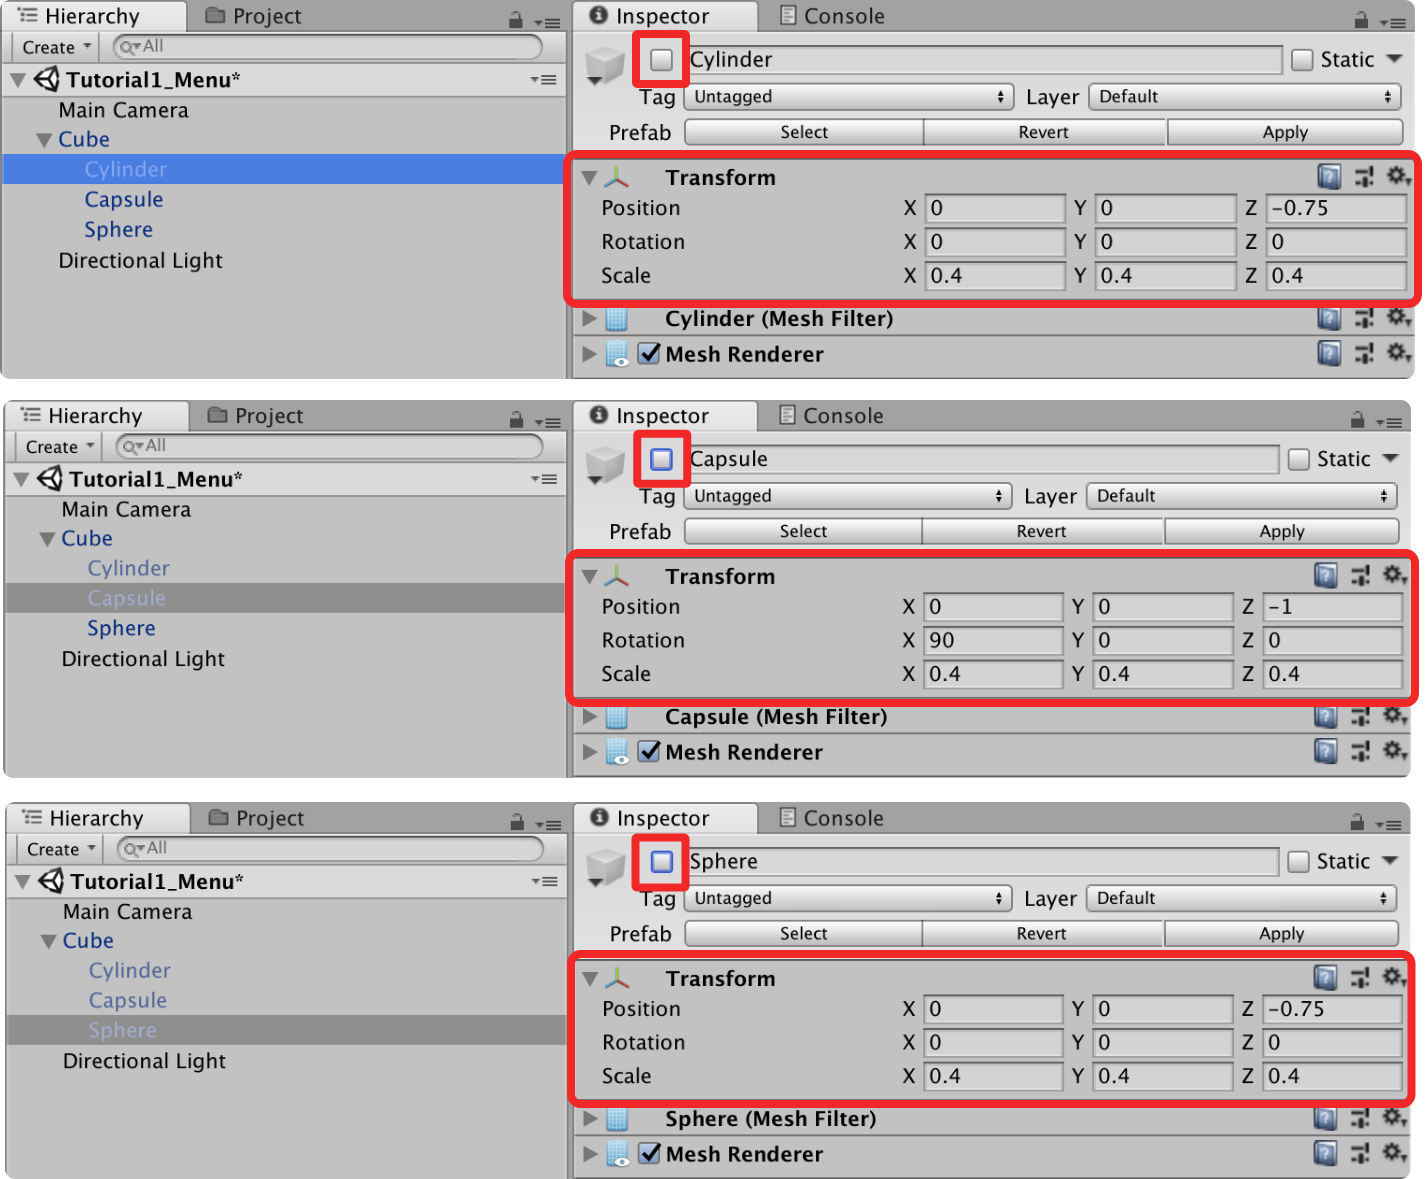
It's time to setup some very simple place-holder weapons for our Cube prefab, drag a copy of the prefab into an empty scene, make sure it's positioned at (0, 0, 0) in the scene. Create a new sphere, capsule and cylinder at (0, 0, 0) and also make them children of the Cube. Remove the default colliders and make sure to disable the three objects, so that they are all off by default. The transform settings I used for them are as follows:
This simply gives us an easy way to see which weapon we have active currently. Make sure to apply the changes to the prefab either by hitting Apply at the top of the inspector when the Cube is Selected or simply by dragging in the Cube from the scene into the Cube prefab in the Project window.
We will start to make some modifications to our scripts. At the top of our CubeBehaviour script we are now going to add a new variable called WeaponObjects which is an array of unity GameObject.
C#
using UnityEngine;
using System.Collections;
using Bolt;

public class CubeBehaviour : Bolt.EntityEventListener<ICubeState>
{
    public GameObject[] WeaponObjects;
    // ...
}
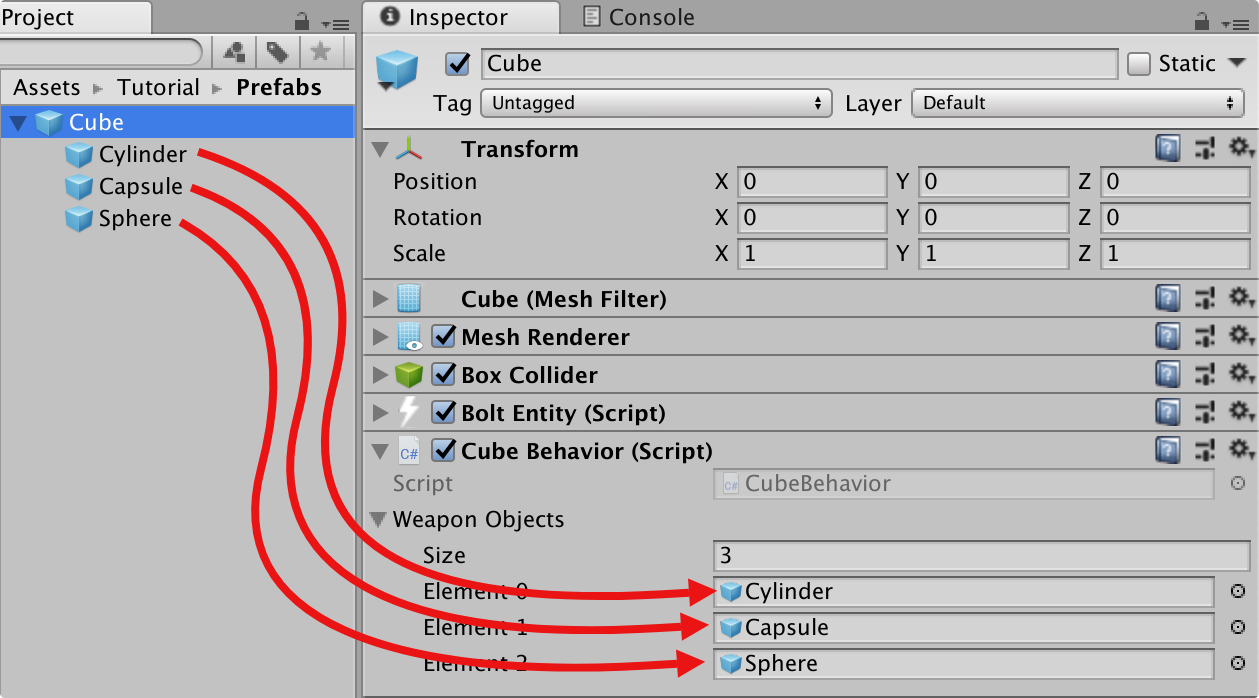
Go into the inspector for our Cube prefab and drag the three child objects into the WeaponObjects array inspector field.
We're going to add quite a lot of new code to our CubeBehaviour script now, to get our weapons setup properly we need to setup the weapons for each player on the owner, inside Attached. We also need to hook up a callback so we get a notification when the active weapon slot changes.
C#
// ...

public override void Attached()
{
    _renderer = GetComponent<Renderer>();

    state.SetTransforms(state.CubeTransform, transform);

    if (entity.IsOwner)
    {
        state.CubeColor = new Color(Random.value, Random.value, Random.value);

        // NEW: On the owner, we want to setup the weapons, the Id is set just as the index
        // and the Ammo is randomized between 50 to 100
        for (int i = 0; i < state.WeaponArray.Length; ++i)
        {
            state.WeaponArray[i].WeaponId = i;
            state.WeaponArray[i].WeaponAmmo = Random.Range(50, 100);
        }

        //NEW: by default we don't have any weapon up, so set index to -1
        state.WeaponActiveIndex = -1;
    }

    state.AddCallback("CubeColor", ColorChanged);

    // NEW: we also setup a callback for whenever the index changes
    state.AddCallback("WeaponActiveIndex", WeaponActiveIndexChanged);
}

// ...
There's a new for loop inside the if(entity.IsOwner) block which lets us initialize the three weapon slots, here we use the WeaponArray property we defined on our state in the Bolt Assets window.
As you can see it functions mostly like a normal array. We assign one of the weapon object models to .WeaponId and then we randomly pick an ammo count between 50 and 100 and assign it to .WeaponAmmo.
We also set the .WeaponActiveIndex property to -1, meaning that we don't have a weapon up by default.
The last thing we do is at the end where we add a callback to the "WeaponActiveIndex" property so that we get a notification when the active weapon changes.
The WeaponActiveIndexChanged method looks like this.
C#
void WeaponActiveIndexChanged()
{
    for (int i = 0; i < WeaponObjects.Length; ++i)
    {
        WeaponObjects[i].SetActive(false);
    }

    if (state.WeaponActiveIndex >= 0)
    {
        int objectId = state.WeaponArray[state.WeaponActiveIndex].WeaponId;
        WeaponObjects[objectId].SetActive(true);
    }
}
The first thing we do is to just disable all weapon objects, we then check if our index is >= 0 and if it is we grab the .WeaponId and use that to enable the correct object to show. The last thing we need to do is just polling some standard Unity input in SimulateOwner, like this:
C#
public override void SimulateOwner()
{
    var speed = 4f;
    var movement = Vector3.zero;

    if (Input.GetKey(KeyCode.W)) { movement.z += 1; }
    if (Input.GetKey(KeyCode.S)) { movement.z -= 1; }
    if (Input.GetKey(KeyCode.A)) { movement.x -= 1; }
    if (Input.GetKey(KeyCode.D)) { movement.x += 1; }

    // NEW: Input polling for weapon selection
    if (Input.GetKeyDown(KeyCode.Alpha1)) state.WeaponActiveIndex = 0;
    if (Input.GetKeyDown(KeyCode.Alpha2)) state.WeaponActiveIndex = 1;
    if (Input.GetKeyDown(KeyCode.Alpha3)) state.WeaponActiveIndex = 2;
    if (Input.GetKeyDown(KeyCode.Alpha0)) state.WeaponActiveIndex = -1;

    if (movement != Vector3.zero)
    {
        transform.position = transform.position + (movement.normalized * speed * BoltNetwork.FrameDeltaTime);
    }

    if (Input.GetKeyDown(KeyCode.F))
    {
        var flash = FlashColorEvent.Create(entity);
        flash.FlashColor = Color.red;
        flash.Send();
    }
}
The complete CubeBehaviour script now looks like this.
C#
using System.Collections;
using System.Collections.Generic;
using UnityEngine;
using Bolt;

public class CubeBehaviour : Bolt.EntityEventListener<ICubeState>
{
    public GameObject[] WeaponObjects;

    private float _resetColorTime;
    private Renderer _renderer;

    public override void Attached()
    {
        _renderer = GetComponent<Renderer>();

        state.SetTransforms(state.CubeTransform, transform);

        if (entity.IsOwner)
        {
            state.CubeColor = new Color(Random.value, Random.value, Random.value);

            // NEW: On the owner, we want to setup the weapons, the Id is set just as the index
            // and the Ammo is randomized between 50 to 100
            for (int i = 0; i < state.WeaponArray.Length; ++i)
            {
                state.WeaponArray[i].WeaponId = i;
                state.WeaponArray[i].WeaponAmmo = Random.Range(50, 100);
            }

            //NEW: by default we don't have any weapon up, so set index to -1
            state.WeaponActiveIndex = -1;
        }

        state.AddCallback("CubeColor", ColorChanged);

        // NEW: we also setup a callback for whenever the index changes
        state.AddCallback("WeaponActiveIndex", WeaponActiveIndexChanged);
    }

    public override void SimulateOwner()
    {
        var speed = 4f;
        var movement = Vector3.zero;

        if (Input.GetKey(KeyCode.W)) { movement.z += 1; }
        if (Input.GetKey(KeyCode.S)) { movement.z -= 1; }
        if (Input.GetKey(KeyCode.A)) { movement.x -= 1; }
        if (Input.GetKey(KeyCode.D)) { movement.x += 1; }

        // NEW: Input polling for weapon selection
        if (Input.GetKeyDown(KeyCode.Alpha1)) state.WeaponActiveIndex = 0;
        if (Input.GetKeyDown(KeyCode.Alpha2)) state.WeaponActiveIndex = 1;
        if (Input.GetKeyDown(KeyCode.Alpha3)) state.WeaponActiveIndex = 2;
        if (Input.GetKeyDown(KeyCode.Alpha0)) state.WeaponActiveIndex = -1;

        if (movement != Vector3.zero)
        {
            transform.position = transform.position + (movement.normalized * speed * BoltNetwork.FrameDeltaTime);
        }

        if (Input.GetKeyDown(KeyCode.F))
        {
            var flash = FlashColorEvent.Create(entity);
            flash.FlashColor = Color.red;
            flash.Send();
        }
    }

    public override void OnEvent(FlashColorEvent evnt)
    {
        _resetColorTime = Time.time + 0.2f;
        _renderer.material.color = evnt.FlashColor;
    }

    void Update()
    {
        if (_resetColorTime < Time.time)
        {
            _renderer.material.color = state.CubeColor;
        }
    }

    void OnGUI()
    {
        if (entity.IsOwner)
        {
            GUI.color = state.CubeColor;
            GUILayout.Label("@@@");
            GUI.color = Color.white;
        }
    }

    void ColorChanged()
    {
        GetComponent<Renderer>().material.color = state.CubeColor;
    }

    void WeaponActiveIndexChanged()
    {
        for (int i = 0; i < WeaponObjects.Length; ++i)
        {
            WeaponObjects[i].SetActive(false);
        }

        if (state.WeaponActiveIndex >= 0)
        {
            int objectId = state.WeaponArray[state.WeaponActiveIndex].WeaponId;
            WeaponObjects[objectId].SetActive(true);
        }
    }
}
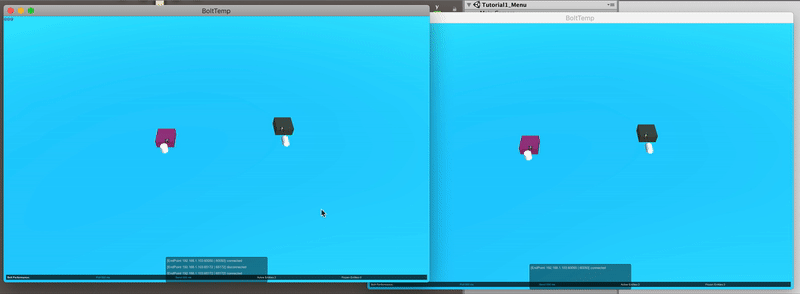
If you build your game and start a server and client, you will be able to pick a weapon using the 1, 2 and 3 keys on the keyboard, and it should look something like this.
Currently we are not using the WeaponAmmo property for anything, but you can still see the value of it.
Continue in next chapter >>.
Back to top