Photon Cloud and Relay
Photon Bolt has support for Photon's industry proven matchmaking and global relay network. This grants to you the ability to connect the right players to the right matches, by creating game sessions, getting rooms info and applying filters to get the best match for your players.
If you are using the Bolt Free version, this will be the only way to make the connection between your players (you can look here to see the main differences between Free and Pro versions), but you will be supported by our global cloud infrastructure. Furthermore, Bolt will always try to connect the peers directly, using its punchthrough capabilities, and when this is not possible, our servers will act as relay devices, granting a great experience to your customers.
Setup
The PhotonCloud folder contains example scripts/scenes/entities showing how you can start using Photon Bolt + Photon Cloud.
In the following, we will explain how you will be able to create Bolt servers and connect clients to it using the same API used to connect via LAN.
Before proceeding, please register and create an Bolt Photon App ID on Photon Engine Dashboard page.
After you install Bolt Free, and follow the setup instructions on the Wizard window, you will have everything in place to start using the Photon services.
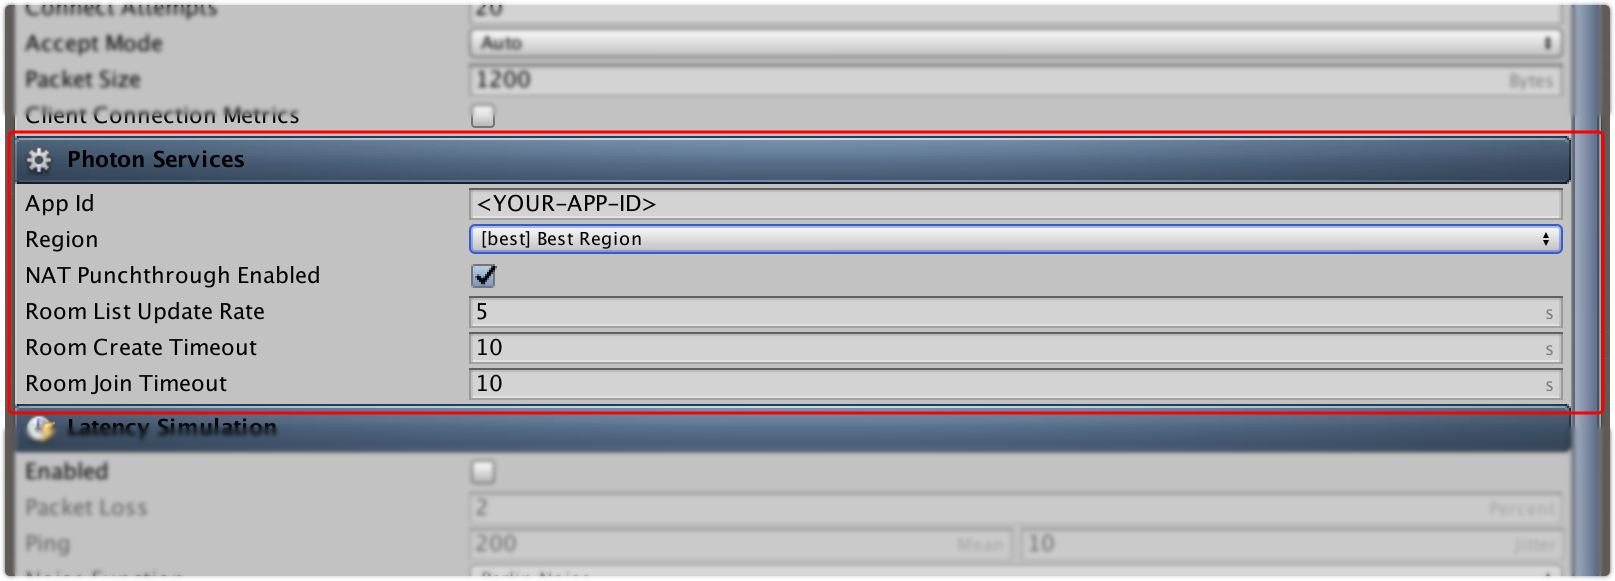
You can verify if your settings are right by looking at the Bolt Settings window (Bolt/Settings), under Photon Services category.
Demo
On this example, we show the simplest way to use Bolt with Photon Cloud services.
Navigate to the folder Assets/samples/PhotonCloud/demo_simple, you will find two folders:
Scenes: contains the tutorial scenes.PhotonTutorial: basic scene that shows the menu to create a server or client player.PhotonGame: simple game scene. This can be found atAssets/samples/PhotonCloud/demo_lobby/Scenes.
Scripts: folder with all scripts needed to make the demo work:PhotonInit.cs: entry point script to use Photon Cloud integration, more details below.PhotonTokens.cs: class to register someTokensnecessary to run the demo.PhotonServerCallbacks.cs: class that extends fromBolt.GlobalEventListenerand show debug messages about the connection between server and clients, like connect, disconnect and connection requests.
Open the PhotonInit.cs script and take a look at some topics:
1. Register all Tokens
When you need to transfer data using the Bolt operations, you first need to register some Protocol Tokens, in this example is not different. To know more about "Tokens" follow this link. Besides the normal Tokens that you can create, the Bolt integration provides the PhotonRoomProperties Token, that you can use to set custom properties to the Photon Session.
Here is shown how you normally register the Bolt Tokens:
2. Configure Bolt to use the Photon Cloud platform
By default, Bolt Free is setup to use Photon Cloud platform with any default configuration setted via the Bolt Settings window. You can also change or setup these informations by code, as shown below:
C#
// ...
void Awake() // Line 32 on PhotonInit.cs
{
    // Default initilization of the Photon platform.
    // This will use configuration values from Bolt's settings window.
    BoltLauncher.SetUdpPlatform(new PhotonPlatform());

    // OR

    // You may want to configure the Photon integration programatically:
    BoltLauncher.SetUdpPlatform(new PhotonPlatform(new PhotonPlatformConfig
    {
        AppId = "<your-app-id>", // your App ID
        Region = PhotonRegion.GetRegion("<region>"), // your desired region
        UsePunchThrough = true, // enable the punch through feature
        RoomUpdateRate = 5, // session update rate
        RoomCreateTimeout = 10, // timeout when creating a room
        RoomJoinTimeout = 10 // timeout when joining a room
    }));
}
// ...
3. Starting Bolt
Initialize the player as usual, using the same API.
C#
// ...
// Line 58 on PhotonInit.cs
if (GUILayout.Button("Start Server", GUILayout.ExpandWidth(true)))
{
    BoltLauncher.StartServer(); // Start as Server
    // ...
}
if (GUILayout.Button("Start Client", GUILayout.ExpandWidth(true)))
{
    BoltLauncher.StartClient(); // Start as Client
    // ...
}
// ...
4. Create and publish a room
As the game host, you can create a room and publish to the cloud, later the clients will be able to connect to it. Here you have two options: (i) initilize the room with a custom Token with any arbitrary data or (ii) use the PhotonRoomProperties Token to setup custom properties and metadata of the room.
C#
// ...
// Line 71 on PhotonInit.cs
if (GUILayout.Button("Publish HostInfo And Load Map", GUILayout.ExpandWidth(true)))
{
    // Use a custom Protocol Token
    RoomProtocolToken token = new RoomProtocolToken()
    {
        ArbitraryData = "My DATA",
        password = "mysuperpass123"
    };

    // OR

    // Use the PhotonRoomProperties to pass custom properties to the room
    PhotonRoomProperties token = new PhotonRoomProperties();
    token.IsOpen = true; // set if the room will be open to be joined
    token.IsVisible = true; // set if the room will be visible
    token.AddRoomProperty("t", 1); // custom property
    token.AddRoomProperty("m", 2); // custom property

    string matchName = "MyPhotonGame #" + UnityEngine.Random.Range(1, 100);

    BoltNetwork.SetServerInfo(matchName, token);
    BoltNetwork.LoadScene("PhotonGame");
}
// ...
5. List all available rooms to connect
As a client, you can get the list of rooms either by looking at the BoltNetwork.SessionList or hooking at the GlobalEventListener.SessionListUpdated callback. Each Session description, contains several metadatas about the room, with this information you can filter rooms or make any kind of matchmaking.
As an example, we get the list of sessions from BoltNetwork.SessionList variable, and for each room, we extract the Protocol Tokens by calling the GetProtocolToken() method. As you can see, if you have used the PhotonRoomProperties Token to setup your room, all custom data can be found diretly inside the the Session's Properties member.
In order to connect to a specfic session, just pass the reference to BoltNetwork.Connect(session, token) method (with the option to pass another custom token), that Bolt will start the connection process.
C#
// ...
// Line 98 on PhotonInit.cs
if (BoltNetwork.IsRunning && BoltNetwork.IsClient)
{
    GUILayout.Label("Session List");

    foreach (var session in BoltNetwork.SessionList)
    {
        // Simple session
        UdpSession udpSession = session.Value as UdpSession;

        // Skip if is not a Photon session
        if (udpSession.Source != UdpSessionSource.Photon) { continue; }

        // Photon Session
        PhotonSession photonSession = udpSession as PhotonSession;

        string sessionDescription = String.Format("{0} / {1} ({2})",
            photonSession.Source, photonSession.HostName, photonSession.Id);

        RoomProtocolToken token = photonSession.GetProtocolToken() as RoomProtocolToken;

        if (token != null)
        {
            sessionDescription += String.Format(" :: {0}", token.ArbitraryData);
        }
        else
        {
            object value_t = -1;
            object value_m = -1;

            if (photonSession.Properties.ContainsKey("t"))
            {
                value_t = photonSession.Properties["t"];
            }

            if (photonSession.Properties.ContainsKey("m"))
            {
                value_t = photonSession.Properties["m"];
            }

            sessionDescription += String.Format(" :: {0}/{1}", value_t, value_m);
        }

        if (GUILayout.Button(sessionDescription, GUILayout.ExpandWidth(true)))
        {
            ServerConnectToken connectToken = new ServerConnectToken
            {
                data = "ConnectTokenData"
            };

            BoltNetwork.Connect(photonSession, connectToken);
        }
    }
}
// ...
If you want to look the complete script, you can check it at your Bolt installation or on our Samples repo here.
The other two scripts (PhotonTokens and PhotonServerCallbacks) are simple enough, just with some Token definitions and several logs messages to track the current status of the Bolt workflow.
Playing the Game
The described script on the session above is just an starting point, from there you can include a better GUI or matchmaking capabilities.
In order run the game using this script, follow the next instructions:
- Setup the scenes.
Go toFile/Build Settings...and in theScenes in Builddrag and drop two scenes:
- (0)
Assets/samples/PhotonCloud/demo_simple/Scenes/PhotonTutorial - (1)
Assets/samples/PhotonCloud/demo_lobby/Scenes/PhotonGame
Compile Bolt.
Before anything, you need to compile Bolt to make it aware of all yours Prefabs/Entities. Please runBolt/Compile Assembly.Build the player.
Go ahead and build a standalone version of the game.Running the players.
Open two instances of the game:- On the first one click on
Start Server, thenPublish HostInfo And Load Map. This will load the game scene and publish the room to the cloud. - On the other player, click on
Start Client, then wait for a few seconds, the list of rooms will be updated and you will get one room listed with some descriptive information. Click on the room's name, the client should connect to server and load the in-game scene. At this point, the client should start the connection with the server, an both peer will show up on the screen.
- On the first one click on