3 - Movement & Camera
Overview
In Part 3 the existing scene gets extended by adding player movement based on player input and a first person camera that follows the correct player object.
Player Movement
In Fusion, gameplay code that updates every tick such as movement should not run in Update / FixedUpdate. Instead, FixedUpdateNetwork should be used. This ensures that the movement is smooth and interpolates correctly on all clients.
Create a new script and name it PlayerMovement and add the following code to the script:
C#
using Fusion;
using UnityEngine;

public class PlayerMovement : NetworkBehaviour
{
    private CharacterController _controller;

    public float PlayerSpeed = 2f;

    private void Awake()
    {
        _controller = GetComponent<CharacterController>();
    }

    public override void FixedUpdateNetwork()
    {
        // FixedUpdateNetwork is only executed on the StateAuthority

        Vector3 move = new Vector3(Input.GetAxis("Horizontal"), 0, Input.GetAxis("Vertical")) * Runner.DeltaTime * PlayerSpeed;

        _controller.Move(move);

        if (move != Vector3.zero)
        {
            gameObject.transform.forward = move;
        }
    }
}
Note that it inherits from NetworkBehaviour instead of MonoBehaviour which provides FixedUpdateNetwork and allows for the use of Networked Properties later on.
Handling Button Presses
One time inputs such as GetButtonDown and up are raised in Unity during Update. In Fusion gameplay code such as movement should be executed in FixedUpdateNetwork. This means special handling is necessary for tracking button states accurately.
Note that the same issue also occurs when checking for button presses in FixedUpdate.
There are multiple approaches to capturing inputs like that in FixedUpdateNetwork:
- Query for button down in
Update. Store the result in a bool and use that for game logic. Clear it at the end ofFixedUpdateNetwork. - Use the new Unity Input System and set
Update ModetoManual Updateand callInputSystem.UpdateinFixedUpdateNetwork. - Use Fusion's NetworkInput with
NetworkButtons.
Jumping
Let's implement an example for handling button presses by implementing a jump action for the player. In this case option 1 from the options listed in the previous section is used.
Replace the code in the PlayerMovement script with the following:
C#
using Fusion;
using UnityEngine;

public class PlayerMovement : NetworkBehaviour
{
    private Vector3 _velocity;
    private bool _jumpPressed;

    private CharacterController _controller;

    public float PlayerSpeed = 2f;

    public float JumpForce = 5f;
    public float GravityValue = -9.81f;

    private void Awake()
    {
        _controller = GetComponent<CharacterController>();
    }

    private void Update()
    {
        if (Input.GetButtonDown("Jump"))
        {
            _jumpPressed = true;
        }
    }

    public override void FixedUpdateNetwork()
    {
        // FixedUpdateNetwork is only executed on the StateAuthority

        if (_controller.isGrounded)
        {
            _velocity = new Vector3(0, -1, 0);
        }

        Vector3 move = new Vector3(Input.GetAxis("Horizontal"), 0, Input.GetAxis("Vertical")) * Runner.DeltaTime * PlayerSpeed;

        _velocity.y += GravityValue * Runner.DeltaTime;
        if (_jumpPressed && _controller.isGrounded)
        {
            _velocity.y += JumpForce;
        }

        _controller.Move(move + _velocity * Runner.DeltaTime);

        if (move != Vector3.zero)
        {
            gameObject.transform.forward = move;
        }

        _jumpPressed = false;
    }
}
This code adds a jump function and velocity/gravity handling to the CharacterController.
_jumpPressed is used to track the button state. The button is polled each Update to make sure no press is missed and reset at the end of FixedUpdateNetwork.
C#
if (_controller.isGrounded)
{
    _velocity = new Vector3(0, -1, 0);
}
Is used to make sure the CharacterController remains fixed to the ground even when walking over small slopes and that only jumping allows the player to leave the ground.
For further guidance on handling transient inputs, mouse deltas, and other input timing issues, see Shared Mode Player Input.
Play Testing
With the PlayerMovement script ready, return to Unity and add the PlayerMovement component to the PlayerCharacter prefab.
Now it is time to test the player movement. To have two clients available start by creating a Unity build.
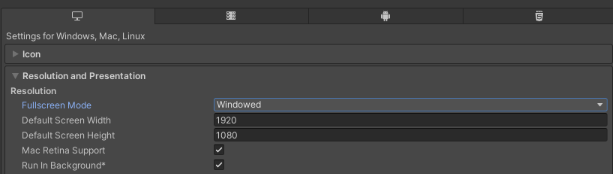
Go to File > Build Settings and add the current scene to the list. Then press the Player Settings button on the bottom left of the window.
In the Player Settings under Resolution and Presentation set the Fullscreen Mode to Windowed and ensure Run In Background is checked.
Return to the Build Settings window and select Build and Run to create a build. Enter play mode in Unity once the build is complete, so that two clients are available.
On both clients press the Start Shared Client button. Two players appear, each of them controlled by one of the clients. Test that walking around and jumping works.
Camera
To complete the player setup let's add a camera.
There are many ways of setting up a camera (third person, first person etc.) and different ways to implement them. In a multiplayer game often a single camera that is following the local player object is desired. There are two common ways to achieve this.
- When the local player object gets spawned, have it instantiate a camera.
- Have the camera as part of the scene. When the local player object gets spawned have it attach the camera to itself.
In this tutorial the second approach is used.
Create a new script and name it FirstPersonCamera. Add the following code to it:
C#
using UnityEngine;

public class FirstPersonCamera : MonoBehaviour
{
    public Transform Target;
    public float MouseSensitivity = 10f;

    private float _verticalRotation;
    private float _horizontalRotation;

    private void LateUpdate()
    {
        if (Target == null)
            return;

        transform.position = Target.position;

        float mouseX = Input.GetAxis("Mouse X");
        float mouseY = Input.GetAxis("Mouse Y");

        _verticalRotation -= mouseY * MouseSensitivity;
        _verticalRotation = Mathf.Clamp(_verticalRotation, -70f, 70f);

        _horizontalRotation += mouseX * MouseSensitivity;

        transform.rotation = Quaternion.Euler(_verticalRotation, _horizontalRotation, 0);
    }
}
This is a very simple first person camera implementation. Note that the code does not contain any multiplayer elements. You can replace this camera with any other camera setup that works with a target object including Cinemachine.
Put the FirstPersonCamera behaviour on the MainCamera GameObject in the scene. There is no need to drag in a target. The target will be set up at runtime by code.

To assign the target, open the PlayerMovement script. Add a variable to store the camera:
C#
public Camera Camera;
Then when the player object gets spawned find and set up the camera. The HasStateAuthority guard clause ensures that only the local player's object sets up the camera - other players' objects skip this code entirely.
C#
public override void Spawned()
{
    if (HasStateAuthority == false)
        return;

    Camera = Camera.main;
    Camera.GetComponent<FirstPersonCamera>().Target = transform;
}
Make sure to always use Spawned instead of Awake/Start when initializing NetworkObjects. In Awake/Start the NetworkObject might not be ready to use yet.
HasStateAuthority is only true for objects the player controls, so only the local player object and not other player objects.
Finally, since in first-person games the player character moves in the look direction adjust the movement a bit. In FixedUpdateNetwork, replace the line where the Vector3 move gets calculated with:
C#
Quaternion cameraRotationY = Quaternion.Euler(0, Camera.transform.rotation.eulerAngles.y, 0);
Vector3 move = cameraRotationY * new Vector3(Input.GetAxis("Horizontal"), 0, Input.GetAxis("Vertical")) * Runner.DeltaTime * PlayerSpeed;
Next Shared Mode Basics 4 - Network Properties
Back to top