Finite State Machine
Overview
The Finite State Machine (FSM) addon for the Fusion provides a powerful solution for managing game states and behaviors. With FSM, game developers can create a system of states and transitions that define how game objects interact with each other and with the game world. For more information about state machines, including when and how to use them, please check this page.
FSM is a mathematical model that represents a system as a finite number of states and the transitions between them. In the context of game development, FSM can be used to represent the behavior of game objects such as players, enemies, and NPCs.
Although the FSM addon does not implement the Hierarchical Finite State Machine (HFSM) approach, it still provides a way to create complex behaviors. Each state in the FSM addon can contain one or more sub-state machines (child machines) that can define more specific behaviors and conditions. Since child machines can run in parallel, they solve arguably the most significant disadvantage of pure HFSM systems, which is the parallel execution of states.
Using FSM in game development provides several benefits, including easier maintenance, better organization, and reduced complexity. With FSM, game developers can create a more efficient and scalable system for managing game states and behaviors.

Download
| Version | Release Date | Download |
|---|---|---|
| 2.0.5 | Feb 05, 2025 | Fusion FSM 2.0.5 |
Features
- The FSM addon provides a code-only Finite State Machine solution
- Multiple state machines can run in parallel on the same game object
- States can be further organized by using one or more sub-state machines (child machines), which can also run in parallel
- Transitions logic can be handled by using state priorities and CanEnter/CanExit calls on the states or by defining transition conditions between states in a more traditional approach
Basic Structure
The FSM addon is a code-only solution, meaning that states and transition logic are defined entirely in code. The basic structure of the addon is as follows:
StateMachineController
A script that needs to be added to a game object and is responsible for updating one or more state machines assigned to that object.
StateMachine
StateMachine is a plain class that represents the state machine and is used to store its main properties (e.g. active state, state time) and can be used to control which state should be activated (through methods such as TryActivateState and ForceActivateState).
State
A state represents a certain behavior and can either be a NetworkBehaviour that is added to the game object's hierarchy (inheriting from StateBehaviour) or it can be a plain class (inheriting from State).
Note: It is advised for users to create a common base class of states to add additional properties needed for the specific functionality of the state machine. For example, a common base class EnemyAIState may have references to Enemy and AI components. See more in Extending States section.
How To Start
To start using the FSM addon, follow these steps:
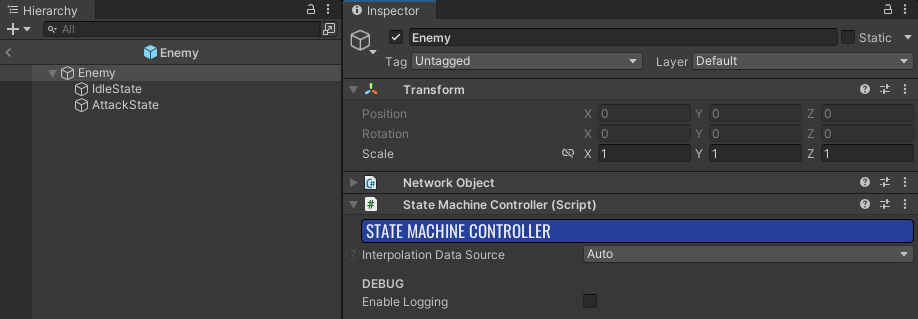
1) Add the StateMachineController script to the network object

The StateMachineController is responsible for updating and synchronizing network data for all state machines in the network object hierarchy.
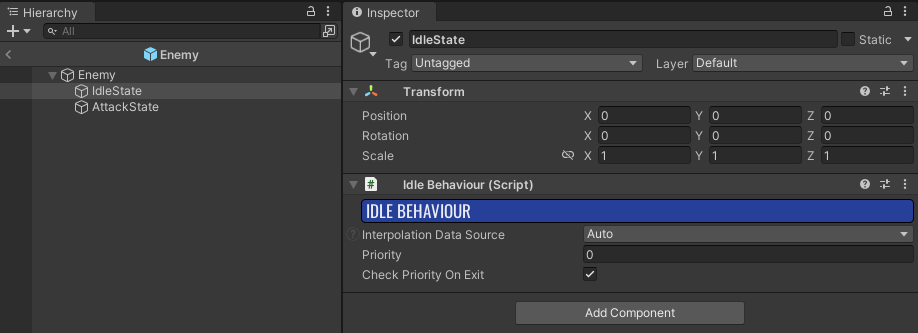
2) Create state behaviour scripts representing your states and assign them to the objects in the network object hierarchy.
C#
public class IdleBehaviour : StateBehaviour
{
    protected override bool CanExitState(StateBehaviour nextState)
    {
        // Wait at least 3 seconds before idling finishes
        return Machine.StateTime > 3f;
    }

    protected override void OnEnterStateRender()
    {
        Debug.Log("Idling...");
    }
}
C#
public class AttackBehaviour : StateBehaviour
{
    protected override void OnFixedUpdate()
    {
        if (Machine.StateTime > 1f)
        {
            // Attack finished, deactivate
            Machine.TryDeactivateState(StateId);
        }
    }

    protected override void OnEnterStateRender()
    {
        Debug.Log("Attacking...");
    }
}

3) Implement the IStateMachineOwner interface on any NetworkBehaviour that will hold the state machine, in our case it is EnemyAI class
C#
RequireComponent(typeof(StateMachineController))]
public class EnemyAI : NetworkBehaviour, IStateMachineOwner
{
    [SerializeField]
    private IdleBehaviour _idleState;
    [SerializeField]
    private AttackBehaviour _attackState;

    private StateMachine<StateBehaviour> _enemyAI;

    void IStateMachineOwner.CollectStateMachines(List<IStateMachine> stateMachines)
    {
        _enemyAI = new StateMachine<StateBehaviour>("Enemy AI", _idleState, _attackState);

        stateMachines.Add(_enemyAI);
    }
}
The StateMachineController finds all components that implement the IStateMachineOwner interface and calls the CollectStateMachines function to obtain all state machines that need to be updated.
During this call, the state machine itself is constructed with all relevant states.
4) From now on, the state machine will be updated. You can start controlling the state machine from FixedUpdateNetwork call.
C#
RequireComponent(typeof(StateMachineController))]
public class EnemyAI : NetworkBehaviour, IStateMachineOwner
{
    [SerializeField]
    private IdleBehaviour _idleState;
    [SerializeField]
    private AttackBehaviour _attackState;

    private StateMachine<StateBehaviour> _enemyAI;

    void IStateMachineOwner.CollectStateMachines(List<IStateMachine> stateMachines)
    {
        _enemyAI = new StateMachine<StateBehaviour>("Enemy AI", _idleState, _attackState);

        stateMachines.Add(_enemyAI);
    }

    public override void FixedUpdateNetwork()
    {
        _enemyAI.TryActivateState(_attackState);
    }
}
State Logic
The states in the FSM addon follow a typical Fusion approach - some methods are used to manipulate networked state (equivalent to FixedUpdateNetwork). These methods should only be used for input and state authority.
CanEnterState - Determines if the state can be entered
CanExitState - Determines if the state can be exited
OnEnterState - Triggered when the state is activated
OnFixedUpdate - Equivalent to FixedUpdateNetwork of the state
OnExitState - Triggered when the state is deactivated
Some methods are used only for visuals and are called on all clients:
OnEnterStateRender - Used, for example, to play the jump particle and sound when entering a jump state
OnRender - Used to update visuals, such as animation parameters
OnExitStateRender - Used, for example, to stop any running particle effects or sounds
Transition Logic
There are two ways to transition from one state to another:
1. Controlling the StateMachine
There are basic methods on the StateMachine that can be used to set the next state:
TryActivateState
The state machine checks the current state's CanExitState and the next state's CanEnterState. If both pass, the state is switched.
Note: When the current state has "Check Priority On Exit" enabled, the state will only switch when the new state has the same or higher priority than the current one.
TryDeactivateState
This is the same as calling TryActivateState(defaultState). The default state is the first state that is passed in the states array when creating a state machine. Default state is networked and can be changed at runtime by calling SetDefaultState on the state machine.
ForceActivateState/ForceDeactivateState
These are similar to TryActivateState/TryDeactivateState except that CanEnterState, CanExitState and state priorities are not checked.
TryToggleState/ForceToggleState
These methods switch the state on and off. When switching off (deactivating), the default state gets activated.
The whole state machine can be controlled by setting the correct state priorities and Enter/Exit conditions. Here is an example of machines controlling Animancer animations:
C#
void IStateMachineOwner.CollectStateMachines(List<IStateMachine> stateMachines)
{
    var playerContext = PreparePlayerContext();

    var fullBodyStates = _fullBodyStatesRoot.GetComponentsInChildren<PlayerStateBehaviour>(true);
    _fullBodyAnimationMachine = new PlayerBehaviourMachine("Full Body", playerContext, fullBodyStates);
    stateMachines.Add(_fullBodyAnimationMachine);

    var weaponStates = _weaponStatesRoot.GetComponentsInChildren<PlayerStateBehaviour>(true);
    _weaponAnimationMachine = new PlayerBehaviourMachine("Weapon", playerContext, weaponStates);
    stateMachines.Add(_weaponAnimationMachine);
}

public override void FixedUpdateNetwork()
{
    if (_player.IsDead == true)
    {
        _fullBodyAnimationMachine.ForceActivateState<PlayerDeathState>();
        return;
    }

    _weaponAnimationMachine.TryToggleState<PlayerArmWeaponState>(_player.InCombat);

    if (_movement.IsGrounded == false)
    {
        _fullBodyAnimationMachine.TryActivateState<PlayerAirborneState>();
    }

    _fullBodyAnimationMachine.TryToggleState<PlayerReviveState>(_revive.IsReviving);
    _fullBodyAnimationMachine.TryToggleState<PlayerInteractionState>(_interaction.IsInteracting);
    _fullBodyAnimationMachine.TryToggleState<PlayerAbilityState>(_abilities.AbilityActive);

    // When other states are deactivated and default (Locomotion) is set, check if it shouldn't be Idle instead
    _fullBodyAnimationMachine.TryToggleState<PlayerIdleState>(_movement.HorizontalSpeed < 0.1f);
}
2. Transitions
Transitions are callback wrappers assigned to states during CollectStateMachines calls. When a state is active, all transitions from that state are checked during the FixedUpdateNetwork call. Transitions are particularly useful when multiple states have the same transition logic to a different state, or when the same transition logic is used in multiple different state machines. That way, transition logic is written only once and used for any number of states.
C#
void IStateMachineOwner.CollectStateMachines(List<IStateMachine> stateMachines)
{
    _enemyAI = new StateMachine<StateBehaviour>("Enemy AI", _idleState, _attackState);
    stateMachines.Add(_enemyAI);

    _idleState.AddTransition(_attackState, CanStartAttack);
}

private bool CanStartAttack()
{
    if (_weapons.HasWeapon == false)
        return false;

    return HasEnemy();
}
When the IsForced flag is set for a transition, CanExitState and CanEnterState of the relevant states are not checked.
C#
_idleState.AddTransition(_attackState, CanStartAttack, true);
Note: State priorities are never checked for transitions.
Be aware that there are alternative AddTransition methods that can take delegate with currentState and targetState as parameters if you need to access transition states.
C#
private static bool CanStartAttack(StateBehaviour currentState, StateBehaviour targetState)
{
    return currentState.Machine.StateTime > 2f;
}
Extending States
It is advised for users to create custom State and StateBehaviour base classes, in order to add additional properties that are needed for specific functionalities of the state machine. For example, a common base class PlayerStateBehaviour has references to AnimancerComponent and CharacterController components. All player state behaviors will inherit from PlayerStateBehaviour base class.
C#
// Player behaviour that should be placed on GameObject in Player hierarchy
// - inherits from standard NetworkBehaviour so standard networked properties can be used
public class PlayerStateBehaviour  : StateBehaviour<PlayerStateBehaviour>
{
    [HideInInspector]
    public CharacterController Controller;
    [HideInInspector]
    public AnimancerComponent Animancer;
}

// Plain class to be used as potential sub-states
// - does not inherit from NetworkBehaviour, create reference for parent PlayerStateBehaviour and store networked properties there
[Serializable]
public class PlayerState : State<PlayerState>
{
    [HideInInspector]
    public PlayerStateBehaviour ParentState;
    [HideInInspector]
    public AnimancerComponent Animancer;
}

// FSM machine to operate with PlayerStateBehaviours
public class PlayerBehaviourMachine : StateMachine<PlayerStateBehaviour>
{
    public PlayerBehaviourMachine(string name, CharacterController controller, AnimancerComponent animancer, params PlayerStateBehaviour[] states) : base(name, states)
    {
        for (int i = 0; i < states.Length; i++)
        {
            var state = states[i];

            state.Controller = controller;
            state.Animancer = animancer;
        }
    }
}

// FSM machine to operate with PlayerStates plain classes, can be used as child machine
public class PlayerStateMachine : StateMachine<PlayerState>
{
    public PlayerStateMachine(string name, PlayerStateBehaviour parentState, AnimancerComponent animancer, params PlayerState[] states) : base(name, states)
    {
        for (int i = 0; i < states.Length; i++)
        {
            var state = states[i];

            state.ParentState = parentState;
            state.Animancer = animancer;
        }
    }
}
Child Machines
This addon can accommodate even very complex scenarios by using child state machines. Child machines are collected in the OnCollectChildStateMachines call on any state.
Child machines should be controlled from the OnEnterState, OnFixedUpdate, and OnExitState methods of the parent state or by defined transitions.
Child machines are updated when their parent state is active. In every other way, they are the same as standard state machines. Child machine states can still be either NetworkBehaviours in the hierarchy (StateBehaviour) or plain classes (State). When plain classes are used, it is convenient to serialize them in the parent state behavior for any needed setup:
C#
public class AdvancedAttackBehaviour : StateBehaviour
{
    [SerializeField]
    private PrepareState _prepareState;
    [SerializeField]
    private AttackState _attackState;
    [SerializeField]
    private RecoverState _recoverState;

    private StateMachine<State> _attackMachine;

    protected override void OnCollectChildStateMachines(List<IStateMachine> stateMachines)
    {
        _attackMachine = new StateMachine<State>("Attack Machine", _prepareState, _attackState, _recoverState);
        stateMachines.Add(_attackMachine);
    }

    protected override void OnEnterState()
    {
        // Reset to Prepare state
        _attackMachine.ForceActivateState(_prepareState, true);
    }

    protected override void OnFixedUpdate()
    {
        if (_recoverState.IsFinished == true)
        {
            // Attack finished, deactivate
            Machine.TryDeactivateState(StateId);
        }
    }

    // STATES

    [Serializable]
    public class PrepareState : State
    {
        protected override void OnFixedUpdate()
        {
            if (Machine.StateTime > 1f)
            {
                Machine.TryActivateState<AttackState>();
            }
        }

        protected override void OnEnterStateRender()
        {
            Debug.Log("Preparing attack...");
        }
    }

    [Serializable]
    public class AttackState : State
    {
        protected override void OnFixedUpdate()
        {
            if (Machine.StateTime > 0.5f)
            {
                Machine.TryActivateState<RecoverState>();
            }
        }

        protected override void OnEnterStateRender()
        {
            Debug.Log("Attacking...");
        }
    }

    [Serializable]
    public class RecoverState : State
    {
        public bool IsFinished => Machine.ActiveStateId == StateId && Machine.StateTime > 2f;

        protected override void OnEnterStateRender()
        {
            Debug.Log("Recovering from attack...");
        }
    }
}
Note: When a parent state of a child machine is deactivated, the current child machine state gets exited and the child machine will not have any active state (active state will be null) until the parent state is active again.
Best Practices
- Avoid modifying networked state or calling state machine control methods (
TryActivateState, etc.) from Render methods. - Always use Render methods for visuals. Note that
OnEnterStateandOnExitStateare not even called on proxies. - State machine execution can be paused by setting the
IsPausedproperty. - When using
Stateplain classes, consider storing a reference to the parentStateBehaviourin them to store any needed networked data. Although it is possible to store custom data in states directly (see Custom State Data), it is far less convenient to do so. - It is not uncommon to have multiple state machines running in parallel on the same object. There are generally two reasons for running multiple state machines:
- Multiple areas require state machine logic, such as one machine for AI and another for animations and visuals.
- Certain logic benefits from parallel execution, such as a general AI machine for executing behaviors like attack, patrol, search, and a movement AI machine for executing movement behaviors like running, strafing, using jumppads, jumping over gaps, etc.
- Machine control methods can be called in different variants -
TryActivateState(int stateId),TryActiveState(StateType state),TryActivateState<StateType>(). If your IDE is not recommending such options make sure you have Fusion.Addons.FSM namespace included in your script.
Debugging
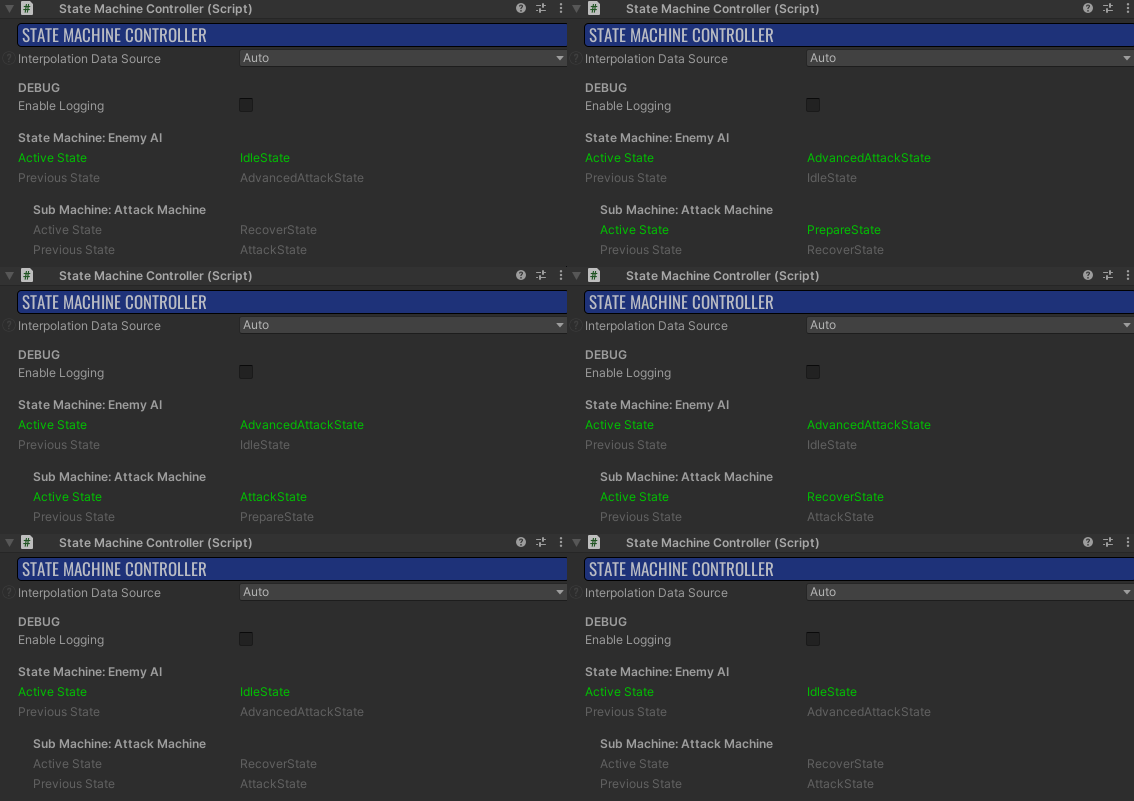
When selecting a game object with the StateMachineController component during runtime, debug information is displayed in the component inspector.

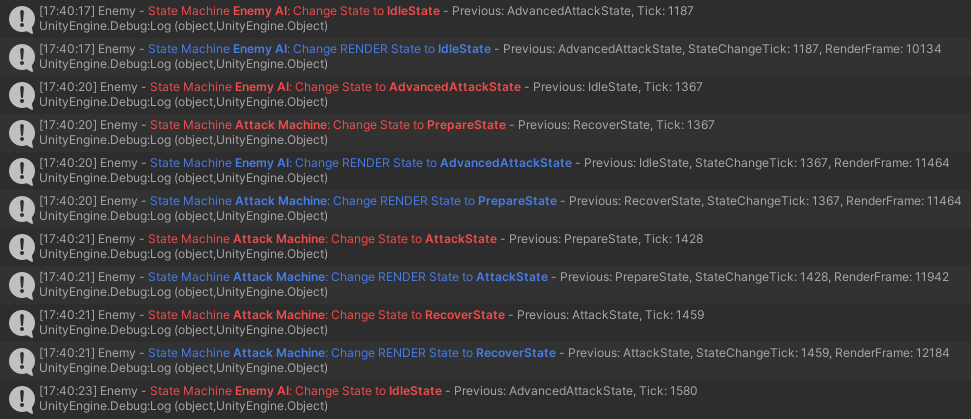
To debug state machine behavior, detailed logging is available. Logging can be enabled in the StateMachineController inspector, which will log all collected state machines. If a more granular approach is needed, users can turn logging on or off for specific state machines.
C#
_stateMachine.EnableLogging = true;

Custom State Data
For advanced users, there is an option to define custom networked data when inheriting from State. To do this, you need to override the GetNetworkDataWordCount, WriteNetworkData, and ReadNetworkData methods.
C#
public unsafe class AttackState : State
{
    public int AttackCount;

    protected override void OnEnterState()
    {
        AttackCount++;
    }

    protected override int GetNetworkDataWordCount() => 1;

    protected override void ReadNetworkData(int* ptr)
    {
        AttackCount = *ptr;
    }

    protected override void WriteNetworkData(int* ptr)
    {
        *ptr = AttackCount;
    }
}
However, in most cases, it is totally fine to simply store a reference to the parent StateBehaviour (which inherits from standard NetworkBehaviour) in the state and store any necessary networked data there (see code snippet in Extending States section).