Voice Intro
Getting Started
Photon Voice 2 is the successor of Photon Voice which brings the following:
- Improved API with better Unity components.
- Compatibility with PUN2.
- Flexibility: since now it is decoupled from PUN2, it can be used (always inside Unity) with Photon Realtime, Photon Bolt, Photon Chat or even standalone.
- New WebRTC based DSP (Digital Signal Processor).
- New updated demos.
Join our discord server to chat with the community or one of our team members when available.
Supported Platforms
- Windows
- UWP
- macOS
- Linux
- Android (for 64-bit support read this)
- iOS
- PlayStation 4 (requires a special add-on that can be downloaded here. Read more about access to consoles here.)
- PlayStation 5 (requires a special add-on that can be downloaded here. Read more about access to consoles here.)
- Nintendo Switch (requires a special add-on that can be downloaded here. Read more about access to consoles here.)
- MagicLeap (Lumin OS, requires a special add-on that can be downloaded here. Read more about Magic Leap here.)
- HoloLens 2 (ARM64 requires a special add-on that can be downloaded here.)
- Xbox One (requires a special add-on that can be downloaded here. Read more about access to consoles here.)
- Xbox Series X and Xbox Series S (requires a special add-on that can be downloaded here. Read more about access to consoles here.)
Install Instructions
The minimal Unity version required is 2018.4.22f1.
Photon Voice 2 can be downloaded and imported from the Unity Asset Store here.
Photon Voice 2 package includes PUN2. PUN 2 already includes Photon Realtime Unity SDK as it depends on it, Photon Chat and Photon Unity libraries. You can clean up PUN2 or clean up Photon Chat from the project if you want to but the other parts are required for Photon Voice to work.
For compatibility with other Photon packages and to guarantee smooth updates, we do not recommend moving Photon assets outside of root Photon folder ("Assets\Photon").
Photon Voice 2 is not compatible with PUN Classic though. Photon Voice Classic is to be used with PUN Classic but both packages will be going away soon.
Clean Import
When you import Photon Voice 2 in a project already containing PUN 2; to avoid any conflicts errors due to versions mismatch, it's recommended to clean up Photon assets before:
- If you don't use another Photon package (e.g. Photon Bolt) delete "Assets\Photon" folder.
- If you imported another Photon package in parallel then delete the following folders:
- "Assets\Photon\PhotonChat"
- "Assets\Photon\PhotonRealtime"
- "Assets\Photon\PhotonUnityNetworking"
- "Assets\Photon\PhotonLibs"
You could also follow this step if you want to do a clean import after encountering an issue after updating Photon Voice 2 or importing another Photon package.
Update
We do not recommend importing PUN 2 on top of Photon Voice 2. We always try to release a Photon Voice 2 version just after a PUN 2 update so you could get the latest PUN 2 from Photon Voice 2.
If you encounter an issue when updating Photon Voice 2 from the Unity Asset Store try doing a clean import.
Key Components
VoiceConnection
A VoiceConnection component instance is required in the scene to be able to connect a voice client to Photon Servers. Since voice transmission is possible only inside rooms, the VoiceConnection is used to do the matchmaking and making sure the client is joined to a room.
Recorder
Since the Recorder is a very important component it has its own dedicated page here.
Speaker
The Speaker component is responsible for playing the incoming audio stream. It makes use of Unity's AudioSource component. The component doesn't make much sense on its own outside a context of a audio stream or before getting the information of an incoming stream via its creation event. That event and the data it contains are important to 'link' a local Speaker component to a remote audio stream. In the following section we will explain how the Speaker should be used.
SpeakerFactory
The SpeakerFactory method will be called every time a new remote audio stream info is received. The SpeakerFactory is used to bind a local Speaker component to an incoming audio streams transmitted via a remote Recorder component, this way the audio stream's two ends transmitter and receiver will be linked together. We support a one-to-one relationship between a remote Recorder and local Speaker. By default, you cannot mix and play multiple incoming audio streams using a single Speaker component instance. A Speaker is linked once to a single Recorder, it cannot be linked to the same audio stream multiple times. Also, by default, you cannot play a single incoming audio stream using multiple Speaker component instances.
In the factory, you need to return a Speaker component that will be used to play the received audio frames from that remote audio stream. You could create a new Speaker component or re use an old one or just return null to skip playing all future incoming audio frames from that same remote audio stream.
The parameters passed to the SpeakerFactory method helps you identify the origin or the source of the audio stream. The code in the body of the SpeakerFactory should be used to find the most suitable candidate Speaker component if any (or creates a new one if needed) to play the audio frames that will be received from the incoming audio stream originating from a remote Recorder component.
The SpeakerFactory method accepts 3 parameters and returns a Speaker component that will be used to play incoming audio using the AudioSource component attached to the same GameObject. The 3 parameters accepted by the SpeakerFactory method are:
playerId: the actor number of the player where the audio stream is originating from.voiceId: the number of the audio stream originating from the sameplayerId.userData: custom object set in the Recorder component that is transmitting the audio stream.
Default SpeakerFactory
If you do not explicitly set a SpeakerFactory then the default one VoiceConnection.SimpleSpeakerFactory will be used.
The default VoiceConnection.SimpleSpeakerFactory guarantees that there is a Speaker instantiated locally per remote audio stream.
If you set a SpeakerPrefab then that prefab will be instantiated as a root object in the hierarchy at default position with default rotation.
Otherwise a new GameObject will be created.
The GameObject to which the Speaker component is attached to will be renamed to "Speaker for Player {0} Voice #{1}" and will be destroyed when the remote audio stream will be removed.
Interest Groups Usage Demystified
Photon Voice uses Photon Realtime's "Interest Groups" to separate mutually exclusive "voice channels" belonging to different "voice conversations".
Select "Who To Listen To"
Each actor needs to subscribe to interest groups it's interested in. By default, all actors listen to interest group 0 which could be seen as a global interest group for voice broadcast. If you want to listen to voice sent to other groups you need to subscribe to those groups. You can also unsubscribe from previously subscribed ones. The operation to do all this is:
C#
// without PUN integration:
voiceConnection.Client.OpChangeGroups(groupsToRemove, groupsToAdd);
// with PUN integration:
PhotonVoiceNetwork.Instance.Client.OpChangeGroups(groupsToRemove, groupsToAdd);
Select "Who To Talk To"
Each actor needs to decide to which interest group it wants to transmit audio to. The target interest group can be set using:
C#
recorder.InterestGroup = targetGroup;
Use Cases
In all cases, you always listen to default interest group 0 and you can transmit voice to a single interest group at the same time per Recorder component.
Use cases could be grouped into three different categories:
1. Single Global Group
If you use one single group, at a time, to transmit voice to in all clients and all Recorder components, there is a shortcut to set or switch this global group:
C#
// without PUN integration:
voiceConnection.Client.GlobalInterestGroup = targetGroup;
// with PUN integration:
PhotonVoiceNetwork.Instance.Client.GlobalInterestGroup = targetGroup;
In this case no need to call OpChangeGroups or set Recorder.InterestGroup as it's done internally for you.
Notes:
- If
targetGroupis equal to0then you have the default behaviour. No need to explicitly set it as a global group unless you changed something and want to reset setup. - If
targetGroupis not equal to0then you can still receive voice streams transmitted to that same group. - All
Recordercomponents transmitting will use the same globally set target group in this case.
2. Listen To A Single Group
This is not the same as the previous category as it allows the following:
- Set a different target group per
Recorder. - The group to listen to can be different from the group to talk to.
A. Default Group
C#
// A. unsubscribe from all groups, this is optional if groups were not changed before
// without PUN integration:
voiceConnection.Client.OpChangeGroups(new byte[0], null);
// with PUN integration:
PhotonVoiceNetwork.Instance.Client.OpChangeGroups(new byte[0], null);

// B. set target interest group
photonVoiceRecorder.InterestGroup = targetGroup;
B. Other Group
C#
// A. subscribe to the group to listen to
// without PUN integration:
voiceConnection.Client.OpChangeGroups(new byte[0], new byte[1] { groupToListenTo });
// with PUN integration:
PhotonVoiceNetwork.Instance.Client.OpChangeGroups(new byte[0], new byte[1] { groupToListenTo });

// B. set target interest group
photonVoiceRecorder.InterestGroup = targetGroup;
3. Listen To Multiple Groups
A. Listen To All Pre-Existing Groups
C#
// A. subscribe to all pre-existing groups
// without PUN integration:
voiceConnection.Client.OpChangeGroups(null, new byte[0]);
// with PUN integration:
PhotonVoiceNetwork.Instance.Client.OpChangeGroups(null, new byte[0]);

// B. set target interest group
photonVoiceRecorder.InterestGroup = targetGroup;
Later, you may need to subscribe to groups created after this call.
B. Listen To A List Of Groups
C#
// A. subscribe to a custom list of groups
// without PUN integration:
voiceConnection.Client.OpChangeGroups(new byte[0], groupsToListenTo);
// with PUN integration:
PhotonVoiceNetwork.Instance.Client.OpChangeGroups(new byte[0], groupsToListenTo);

// B. set target interest group
photonVoiceRecorder.InterestGroup = targetGroup;
You can speak to a group other than those you listen to.
i.e. groupsToListenTo could not contain targetGroup.
C. Listen To All Possible Groups
This should be used carefully as it may subscribe the client to groups that will never be used.
C#
using System;
using System.Linq;
// [...]
byte[] allByteValues = Enumerable.Range(1, 255).SelectMany(BitConverter.GetBytes).ToArray();

// A. subscribe to all possible groups
// without PUN integration:
voiceConnection.Client.OpChangeGroups(null, allByteValues);
// with PUN integration:
PhotonVoiceNetwork.Instance.Client.OpChangeGroups(null, allByteValues);

// B. set target interest group
photonVoiceRecorder.InterestGroup = targetGroup;
How To Use Photon Voice Without PUN
Quick Way
- Add a VoiceConnection component to the scene and enable "Don't Destroy On Load".
- Set AppSettings in
VoiceConnection.Settings. - Add a Recorder to the scene, update its properties and assign it to
VoiceConnection.PrimaryRecorder. - Add a Speaker prefab (a prefab that has a Speaker component) and assign it
VoiceConnection.SpeakerPrefab. - Join a room. To do so use any of Photon Realtime's matchmaking operations (see "ConnectAndJoin.cs" utility script for example).
Advanced Options
- Add a VoiceConnection component to the scene.
- Set AppSettings in
VoiceConnection.Settings. - Add a Recorder to the scene, update its properties and assign it to
VoiceConnection.PrimaryRecorder.
3.a. Optionally enableRecorder.TransmitEnabledto start transmission as soon as ready.
3.b. Optionally enableRecorder.DebugEchoModeto hear yourself (a local Speaker needs to be linked, see step 4). - Decide how to link Speaker components with remote audio streams:
4.a. Optionally implement a SpeakerFactory method and assign it toVoiceConnection.SpeakerFactoryby code.
4.b. If you use the default SpeakerFactory, optionally add a Speaker prefab (a prefab that has a Speaker component) and assign itVoiceConnection.SpeakerPrefab. - Join a room. To do so use any of Photon Realtime's matchmaking operations (see "ConnectAndJoin.cs" utility script for example).
- [If not enabled in 3.a.] Once in a room start transmitting by setting
Recorder.TransmitEnabledtotrue. - [If not enabled in 3.b.] Optionally enable
Recorder.DebugEchoModeon the transmitting recorder to hear yourself.
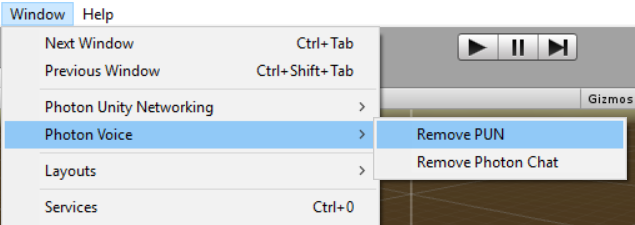
How To Remove PUN
If you want to use Photon Voice without PUN, you can keep PUN inside your project or simply remove it. There is an Editor shortcut for this: "Window" -> "Photon Voice" -> "Remove PUN".
Alternatively, you can do this manually by following these steps:
- Delete "Demos\DemoVoicePUN" folder
- Delete "Photon\PhotonVoice\Code\PUN" folder
- Delete "Photon\PhotonUnityNetworking" folder
- While this should be done for you, make sure that in "Project Settings" -> "Player" -> "Other Settings" -> "Scripting Define Symbols",
PHOTON_UNITY_NETWORKING, allPUN_2_X_OR_NEWERandPUN_2_OR_NEWERare removed.
You can always add the files back at any time by importing Photon Voice 2 from the Asset Store.
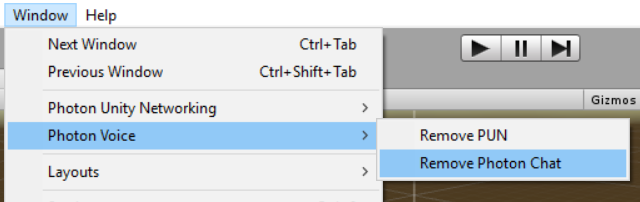
How To Remove Photon Chat
If you want to use Photon Voice without Photon Chat, you can keep Photon Chat inside your project or simply remove it. There is an Editor shortcut for this: "Window" -> "Photon Voice" -> "Remove Photon Chat".
Alternatively, you can do this manually by deleting "Photon\PhotonChat" folder.
You can always add the files back at any time by importing Photon Voice 2 from the Asset Store.
Back to top